How to Apply Halo Hair Extensions
How do you properly put on your halo extensions?
At UniWigs, there are two types of halo hair extensions:
• Single piece halo hair extensions
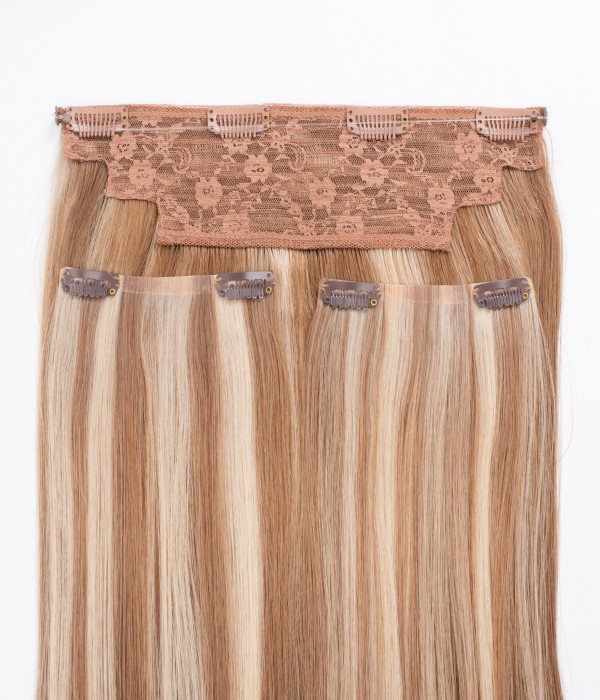
• Three-piece sets including a one-piece halo extension and two small single pieces
So here we will go through the basic steps for wearing both types!

For single piece halo extensions:
This halo extension is sewn with a stretchy weightless halo wire and four sensitive clips attached. Read on for the steps to follow!
STEP 1: BRUSH YOUR HAIR
Brush your own hair thoroughly to remove any tangles. Then, brush out your halo extension using the UniWigs Loop Brush.
STEP 2: SECTION YOUR HAIR
Separate your hair into two sections, as you would for a half-up-half-down style, leaving the hair about 1.5" from your hairline free. Now, tie the top part of your hair into a bun at the top of your head. Leave out the front sections of your hair that frame your face for a natural blend.
STEP 3: APPLY YOUR HALO
Now it's time to adjust the halo wire length to fit the size of your head. To do this, position your halo extension over your bun where you parted your hair. Like a headband, the halo wire should sit comfortably and securely above your ears.
STEP 4: BLEND WITH YOUR HAIR
After you have put on your halo extension, you can let your bun down. Brush all your hair out smoothly. Make sure your real hair is covering all the wefts of the halo extension. Be gentle when you brush, especially when brushing over the wire.
For three-piece halo extensions:
STEP 1: BRUSH YOUR HAIR
Brush your hair thoroughly to remove any tangles. Then, brush out your halo extension and both two-clip wefts.
STEP 2: SECTION YOUR HAIR
Separate your hair into two sections, as you would for a half-up-half-down style, leaving the hair about 1.5" from your hairline free. Now, tie the top part of your hair into a bun at the top of your head. Leave out the front sections of your hair that frame your face for a natural blend.
STEP 3: APPLY YOUR HALO
Now it's time to adjust the halo wire length to fit the size of your head. To do this, position your halo extension over your bun where you parted your hair. Like a headband, the halo wire should sit comfortably and securely above your ears.
After you have applied for your halo extension, the two single pieces should be applied to both sides of your hair. Separate a section of hair two inches above your ear and clip it into the roots of your hair.
Repeat on the other side of your hair.
Step 4: BLEND WITH YOUR HAIR
After you have put on your halo extension and two single pieces, you can let your bun down. Brush all your hair out smoothly. Make sure your real hair is covering all the wefts of your extensions. Be gentle when you brush, especially when brushing over the wire.
Step 5: STYLE
After you have applied for your hair extensions, we suggest adding a few curls to give volume and seamlessly blend your hair with your extensions.
Further Reading:
HOW DO I CHOOSE BETWEEN SINGLE, HALO AND CLIP-IN HAIR EXTENSIONS?
WHAT ARE THE DIFFERENCES BETWEEN CLIP-IN EXTENSIONS AND HALO 2-IN-1 HAIR EXTENSIONS?
SHARE:
Popular Posts
-
Hair Toppers vs. Wigs: The Ultimate Beginner's Guide to Choosing...
![]() 927
927 -
Signature Lavina Low Density Human Hair Wig Natural Lightness,...
![]() 458
458 -
Introducing the Heritage European Hair Collection – Premium...
![]() 438
438 -
UniWigs Heritage European Hair Collection Launch: Luxury Hair for...
![]() 372
372 -
Hair Toppers for Different Stages of Hair Loss: Which One is Right...
![]() 273
273 -
Glossary of Wig and Topper Terms Every Buyer Should Know
![]() 189
189
 927
927 Writers Cooperation:
UniWigs are seeking for blog contributors who know and love hair. If you know alternative hair or hair related accessories, if you have great understanding of hair trends and fashion, if you are expert in hair care, if you have any experience with salons or celebrities, if you would like to share your experience to help people just like you make the right choice, now contact us at [email protected] to be a blog contributor. Let’s discuss the details then.

Comments
Welcome Back!
Forgot your password?